
When we started sailing Triola, our much loved 1970’s Albin Ballad, my beautiful wife to be and I were foot loose and fancy free. We were also free to use the fore cabin double berth as our own.

Sailing Triola pre kiddiwinks, being chased by my late father, Colin Ryans, gaff cutter Wanda
Years passed, we got married and along came our new crew. Thomas originally took the fore cabin, and now resides in the his “cosy” pilot berth (approximately the size of a budget coffin…), and Sophie has the fore cabin double with a cunning stair gate to prevent her leaping to freedom. Elizabeth and me were relegated to sleeping on the skinny saloon berths, one either side, precariously perched.


Inspired by Ben Meakins PBO article from February 2016, where he used Ikea bed slats to make a berth comfier, I thought there had to be a better way for Liz and me to be comfortable on board without breaking the bank. I set about plotting!
The gap between the two main saloon berths was a little under the width of a single bed, however, it was irregular, tapering inwards as you traveled forward towards the mast. What I planned to do was install thin, hardwood rails attached to the front of each berth, routed for the slats to sit in, and then put a foam, fold up mattress on top. What could be simpler! With a week to go until our cruise up the East Coast, I set to work ordering what I needed.

Plan
What you will need
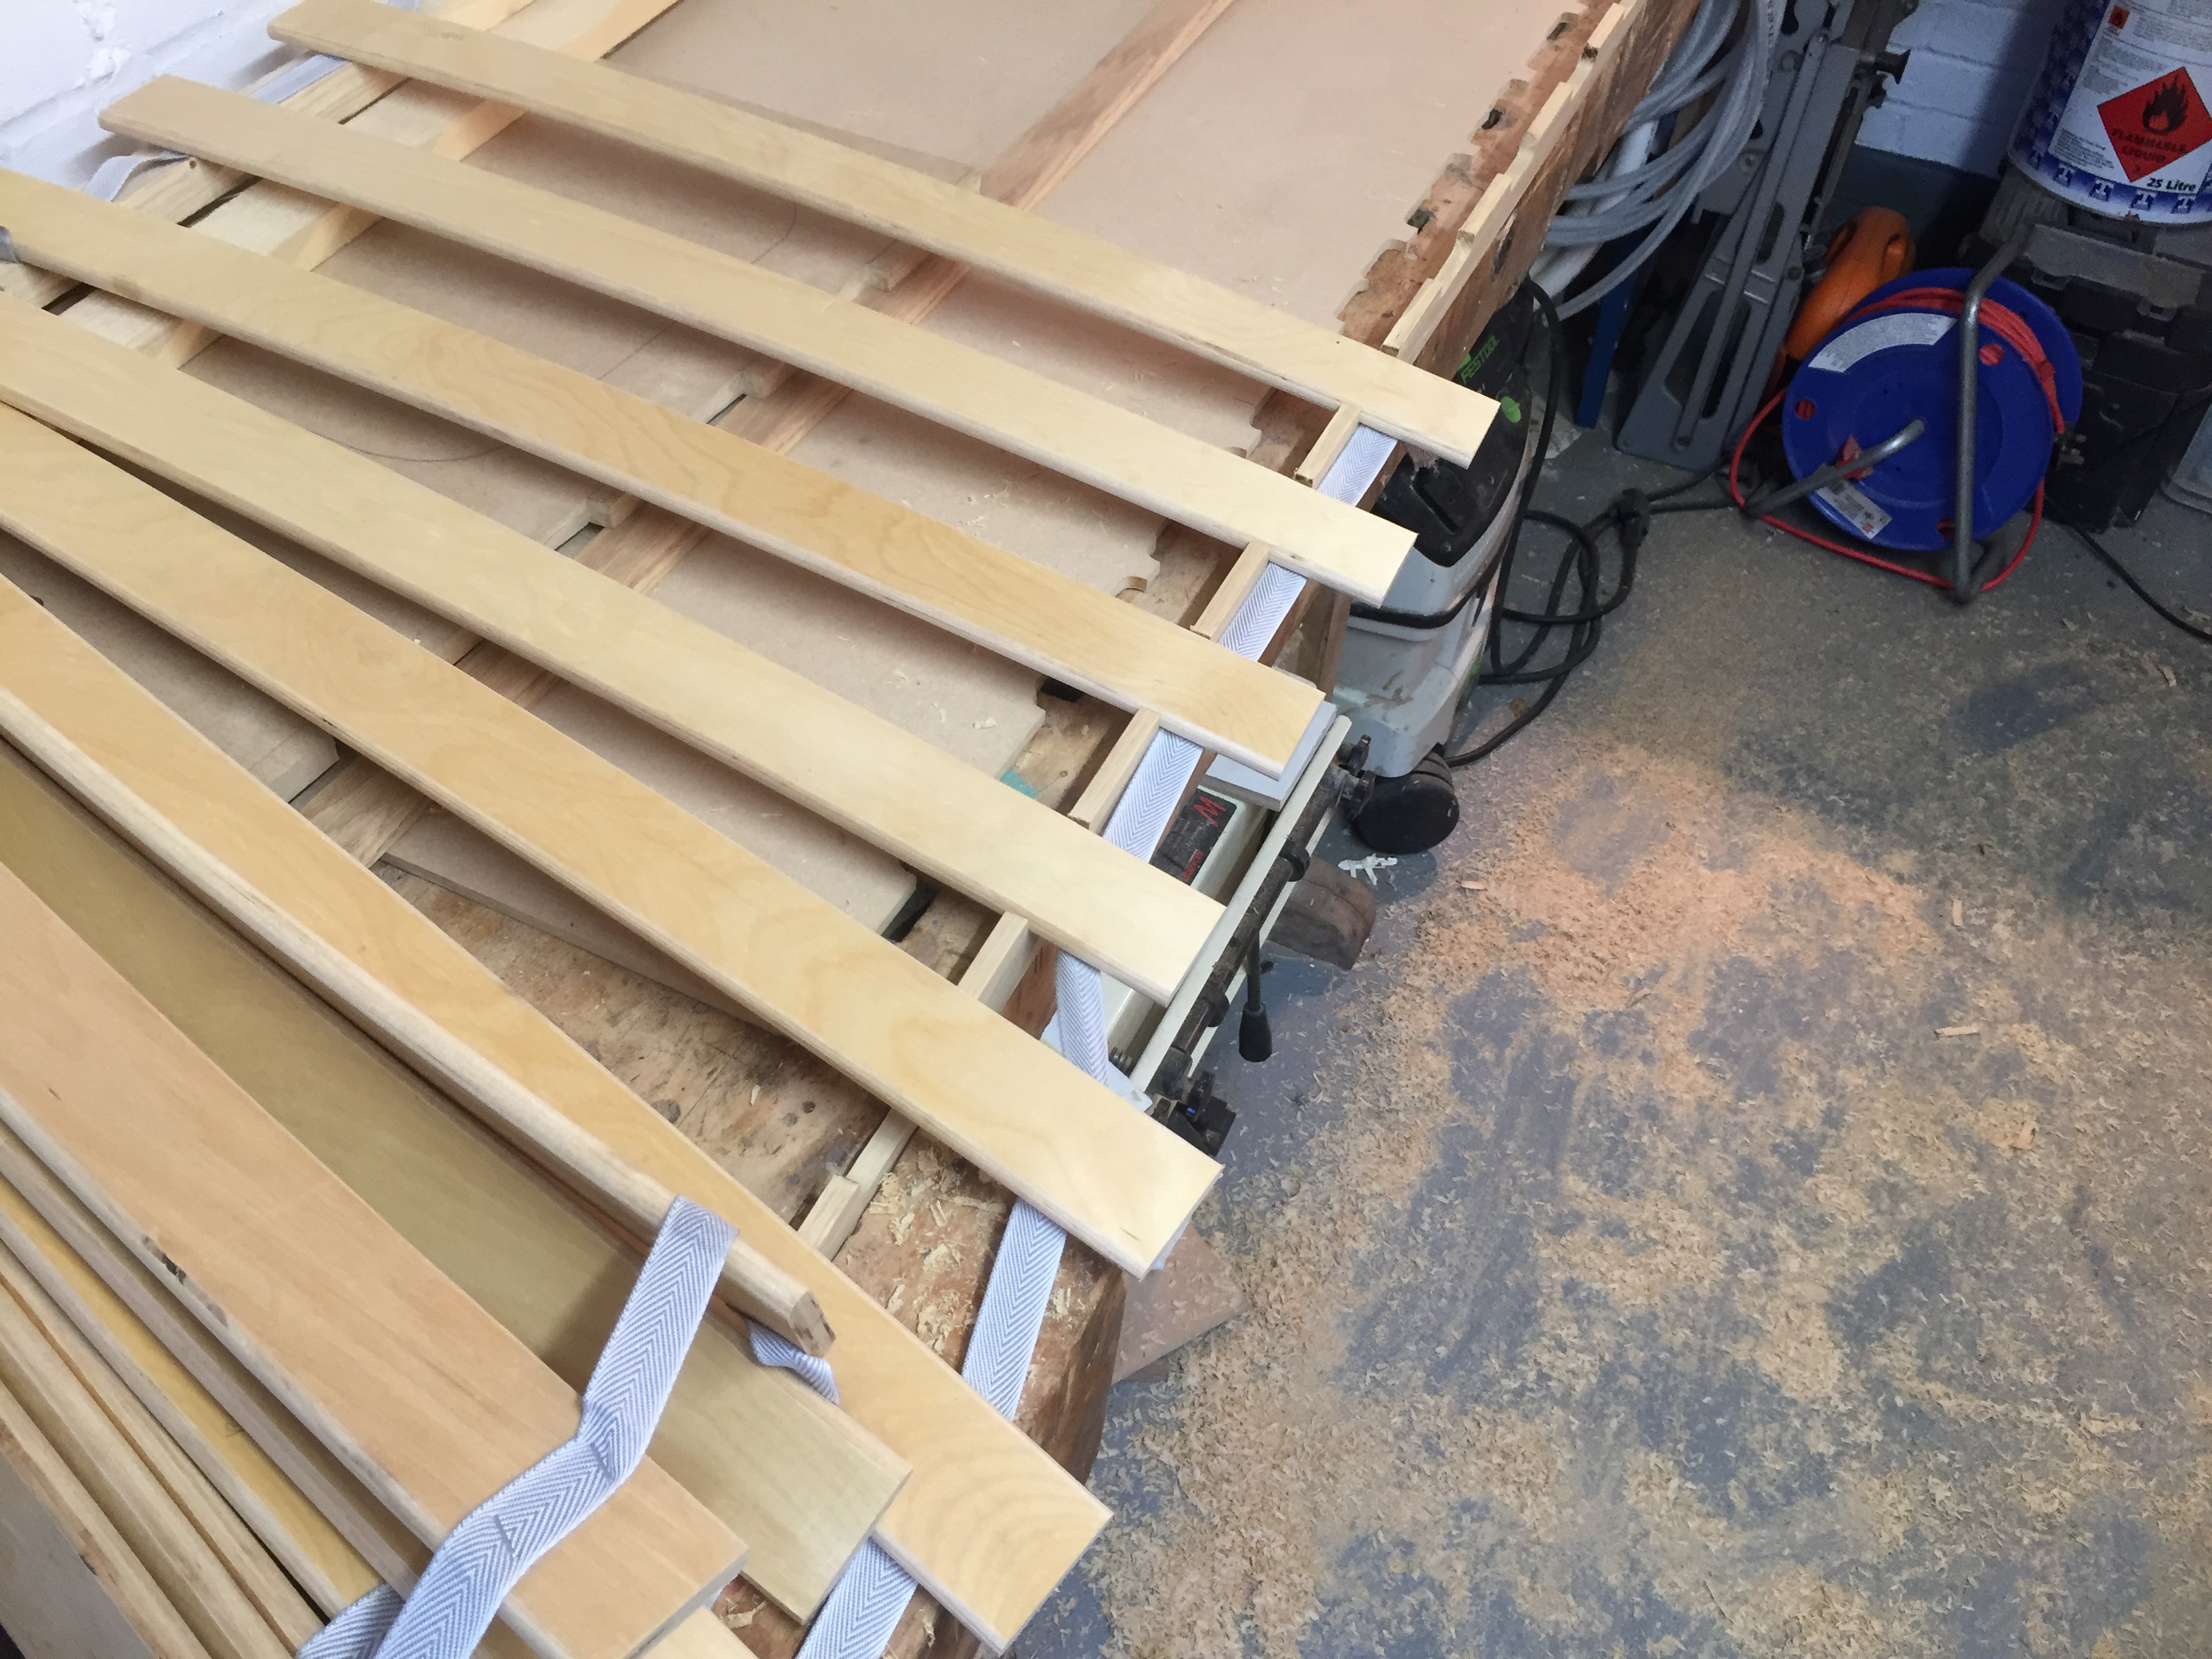
- £20 – Ikea LURÖY bed slats

Ikea bed slats
- £12.99 x 2 – Homebase – Richard Burbidge Flat D-Shape Moulding – White Oak
- £39.95 – Amazon – Fold Out Foam Guest Mattress – Black

Amazon guest mattress
- Tools
- My trusty Festool TS 55R circular saw with its guide rail was certainly useful, however not essential.
- A jigsaw.
- A drill.
- A grinder with a sanding disk.
- Gorilla polyurethane foamy glue.
- Spray water bottle.
- Double sided tape.
- Brass screws.
- A router with a flush trim bit with a top bearing


- PPE – As always, lots of PPE!
- Goggles
- Ear protection
- Gloves
- A respirator (as we’ll be cutting MDF and using Gorilla glue) – Don’t bother with a disposable mask, get a proper respirator with the best filters on it you can get.
No two boats are equal
Even if you have the scale plans to your boat, like me, measure where you plan to span your saloon carefully (it was at this stage I discovered the slight taper). Next measure out you bed slats and the distance between the slats and overlay this onto your measured plan of the saloon. You probably won’t need all sixteen slats if, like me, your mast is keel stepped and is going to prevent you from spanning the whole length of the saloon.
Make a jig and manufacture your rails
Now we have a plan of what we need to produce, it’s time to manufacture our rails that will be attached to the front of the saloon berths from our white oak D section. Use the measurements from our slats to create a jig from scrap MDF that will act as a template for the teeth in our rails. Spend lots of time getting this right, measuring and checking multiple times as any errors will be multiplied many times on your finished rail. Don’t be afraid at this time chuck the whole jig in the bin and start again if you are unsatisfied with it. I used a jigsaw to cut out the basic shape and then a sharp chisel to finish it off.

Jig clamped down
Take your bed slats and offer them up to your template. You want the slats to be under very slight tension to keep them in place on the finished rails.
Use your Jig
Routing your white oak hard wood beading is that hardest part of this job, and the most likely point that you’ll make a pigs ear of this job. The raw materials are not expensive, so put it down to experience if you screw up a few times, and in the words of Sir Winston Churchill – KBO (Keep Buggering On!). Firstly, clamp your jig in place lining up the ‘sharp’ edge of your beading with the edge of the jig, being sure to place another piece of MDF beneath the beading to support it whilst you rout. Failure to support the beading from both sides will lead to it splitting, splintering and generally becoming a right old mess (I talk from experience…). As our beading is so skinny, you’ll need a spacer (you can use another length of beading as that will be the perfect height for the job) in order to sandwich your beading between the jig and your support sacrificial piece of MDF below the beading.
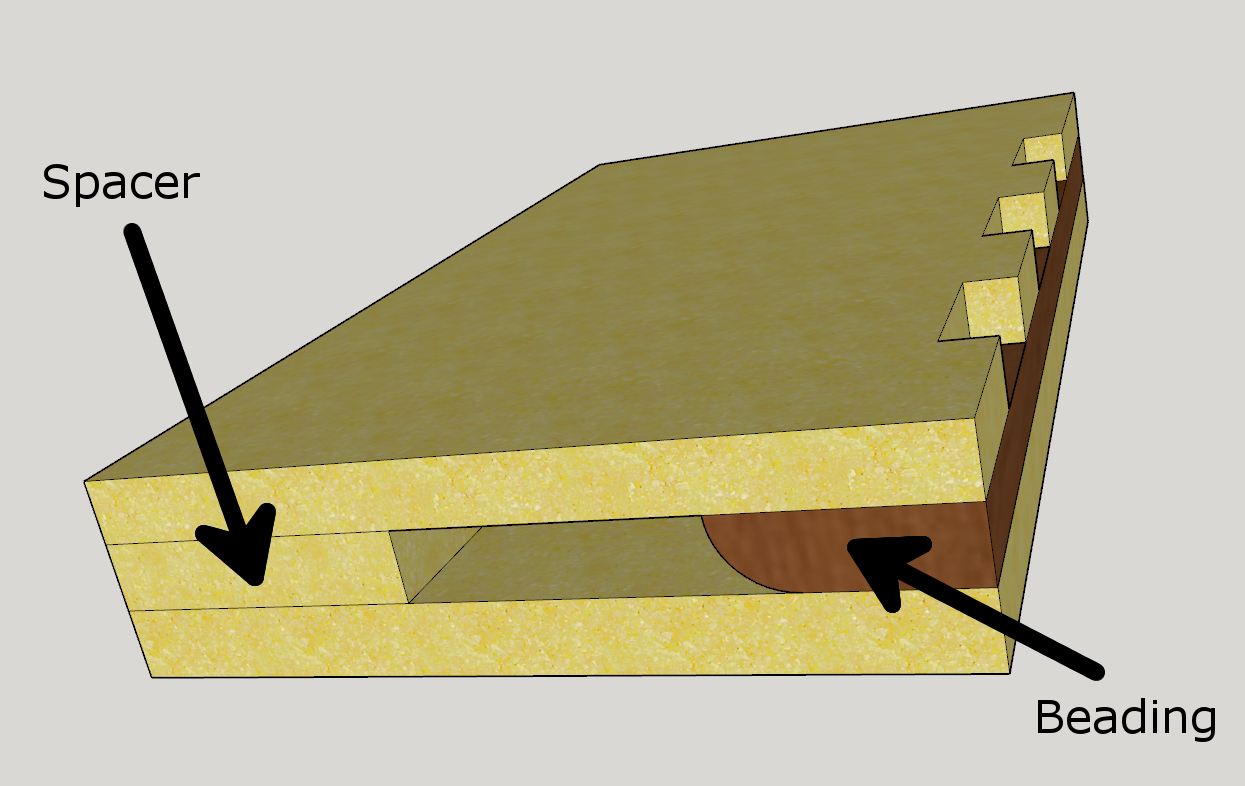
Beading Support
It’s imperative that the beading is firmly gripped, consider using double sided tape to stop the jig skidding around. If it does slip, you will end up with the below sort of effect, so it is best avoided!

Slipped jig result
Set the depth of the router so that the bearing on the top of the router bit sits neatly on your jig and start routing from left to right, as I have explained in previous articles, moving from left to right will ensure you are pushing against the rotation of the router bit and give you more control of the router.

Routing the beading
Note that even though our jig has sharp corners, because of the shape of the router bit, the finished article has pleasing rounded corners. Also note that the sacrificial MDF underneath the beading will be routed too due to the depth of the router bit (hence why the whole set up hangs over the edge of my wood working bench in the above).

Routing complete
Remove your clamps and your jig and offer up your slats to the beading to ensure the spacing is correct and puts your slats under slight tension.
Offer up slats to the rails
Move your jig along, lining the last cut out in your jig up with the last cut out on your beading (to ensure spacing remains constant), and rout out the remaining ‘teeth’ in your rails. Don’t be tempted not to support the beading from underneath fully for each subsequent routing process – you will need a new sacrificial MDF flat edge for each rout else you stand a good chance of splintering or splitting your rail.
Even if you only need two thirds of the length, keep routing until you get to the end of your beading – we’ll cut the rails down to size when we get to the boat later on.
Cut your bed slats down to size…ish
From our original plan we made of our saloon, we’ve probably discovered out boat isn’t as square as we thought it was. Precision is key and the last thing you want to do is cut off too much of any of your bed slats else it will not be properly supported by our very skinny beading. I added a couple of millimetres to each side of my measurements from the boat, and set about laying out my bed slats on trestles ready to cut the excess off the sides.
Use a straight edge to mark out where you want to cut the bed slats being sure, as ever, to measure at multiple points to make sure you are cutting off the amount you think you are (else you’ll be in for another trip to Ikea!).
Line up your circular saw guide rail with your marked line, ensuring the waste is on the ‘cutting’ side of the rail so that the ‘kerf’ (the cutting width of the blade) doesn’t throw out any of our measurements.

Straight edge to mark slats
It is critical for the quality of the resultant work and for your own safety that the slats are adequately secured down. Any movement at all will cause the slats to vibrate ruining and splitting the slat and creating a potentially dangerous situation, so ensure before you start cutting that the slat you are about to cut is adequately secured. The below picture was how I started the operation, however, I was not happy with how secure the slats were, so I ended up securing each slat individually with a clamp front and back to be safe.

Festool TS55R
I found ‘plunging’ down on each slat independently gave a better cut than plunging at one end and cutting forward through each slat. Use your eye and ear protection as a minimum at this stage. If you don’t possess a circular saw with a guide rail, a jigsaw will work just as well for this stage. You may have more slats than you need (as I did) to cover the distance you need to cover on the boat – don’t chop off any slats at this stage, lets retire to the boat and get chopping there instead.
Fit the rails to the boat
I never, truly, trust any measurements I make when we are dealing with a three dimensional puzzle such as this – certainly not down to the millimeter anyway. Additionally, with this job, there is only a tiny margin for error, hence the last part of this job will be crafting our ‘slightly too big’ rails and slats precisely to the boat using a bit of further measuring and a lot of trial, error and chop!

Rails on boat
Start by attaching some double sided tape to your rails and attaching them where you intend for them to sit.

Double sided tape on rails for positioning
At this stage, the rails will be too long. Offer up your slats to one side (as these will be too long to properly span at this stage too) and decide where you want to cut your rails to get the maximum length before (if like me, you have a keel step mast) you are fouled by the mast. Detach the rails and cut them with your jigsaw, and then restick them back on lightly. Drill out some pilot holes for your brass screws and countersink them.

Counter sinking the screw holes
Put your screws in place ready to screw them into their pilot holes (I put a brass screw every second slat) and remove the rail one last time. The screws, alone, would probably be enough to support the bed slats, however, I wanted to use polyurethane glue (in this case ‘Gorilla glue’) to add extra strength to the slim rails.

Screws ready to go
Gorilla glue has some frightening safety information on its bottle (in very small print) – I won’t go into its very mortal warnings, suffice to say, wear gloves, don’t get it on you, wear your respirator and make sure the cabin is well ventilated. Make both your surfaces wet using a spray bottle, apply your Gorilla glue to the back of your rail, and screw both rails on. Don’t bother trying to clean up all the oozing frothy goo coming out from around the rails as the glue goes off – once it is dry it can be easily removed with a sharp chisel.

Rails screwed and glued on
Pat yourself on the back, the hardest bit of the job is done, bug out for today and head to your local hostelry to let the glue go off and come back another day to fit your slats.
Fit the slats to the boat
When you return, use your chisel to remove the remnants of the glue (an inexplicably satisfying experience) and offer up your (oversized) slats to your rails.

Slats offered up to the rails
With any luck, they will all be a couple of millimeters too big (note, the one at the far end fits perfectly before I’ve even trimmed it, lucky I ‘oversized’ it!).

Grinding down the slats
A few of the slats that had more than two millimeters extra I marked and trimmed with my jigsaw, for the rest I used my trusty grinder to attain the perfect angle for the slats (however shallow that angle might be), and the perfect length. Be careful here, note I have no guard on the grinder, this is personal preference: use all these tools at your own risk (the grinders sanding disk will take your fingers off quicker than you can say “accident and emergency waiting times”). Once again, use your mask, even when outside, as the dust will get everywhere and you can never be sure what glues are used when they make up these laminate slats.
Fit each slat individually and always make sure you cut off less than think you’ll need to – it’s easy to grind a bit extra off, pretty tricky to stick some sawdust back on again. With the last slat fitted, any extra slats trimmed off, stand back and observe your new, huge, double berth!
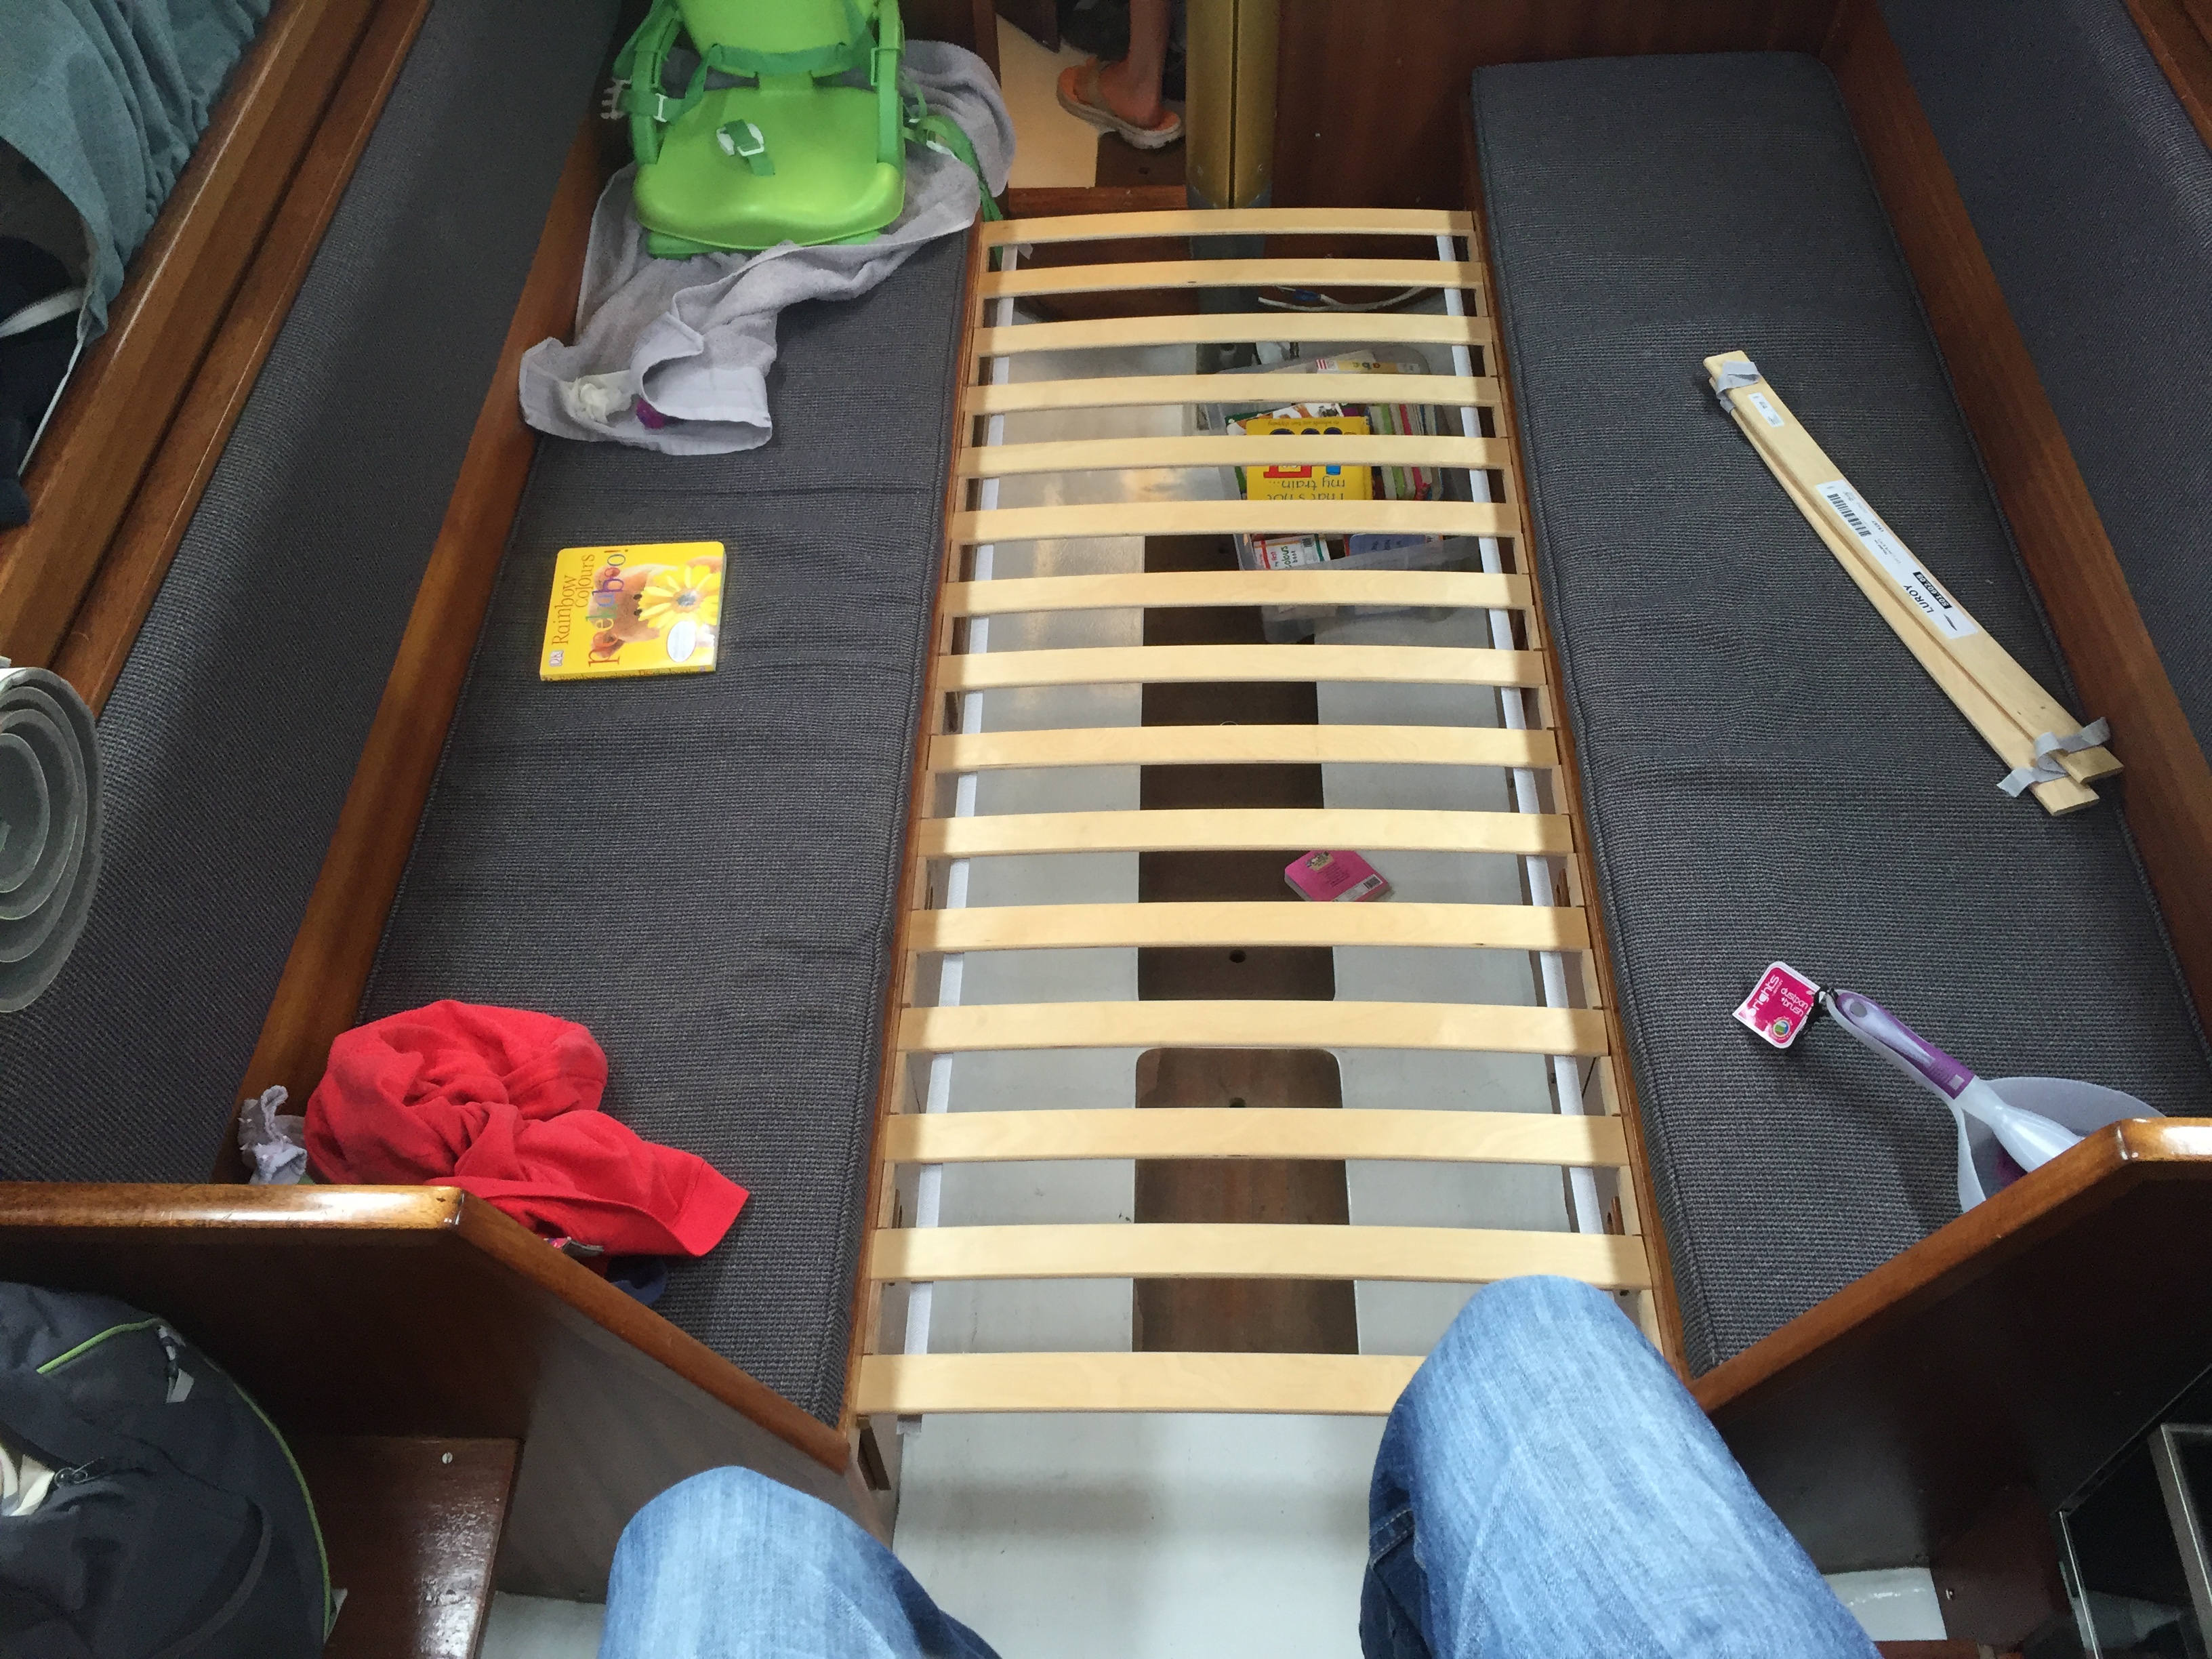
Slats all trimmed and fitted
Fit your Amazon purchased foam insert and then contemplate exactly where the dog is going to sleep and how much weight the thing can take!
Shortly after fitting this, Liz (who was less than convinced), Thomas, Sophie, Patch (the hound) and me went for a three week jaunt up the East Coast and I can report that it can happily support all five of us (yes, including the dog) at one time when the skipper was trying to get an extra few minutes of shut eye. I wouldn’t suggest putting all your weight on one slat, at one time, however, it felt pretty solid throughout.
In takes five minutes to put out and five minutes to put away and it stows very neatly. The slats tuck up behind the port saloon seats and the foam mattress folds away neatly into the fore cabin with the bags when we are in passage making mode. Even the dog is happy as he sees underneath the slats as his own personal dog house (although when it’s time to wake up in the morning, he thinks it’s far more comfortable sitting on top between Liz and me or padding backwards and forwards across the bunk demanding his morning constitutional.)

Mattress down
Finally – no more perching on the edge of tiny saloon seats! All that remains to be done is to varnish the beading, and that’s another job done.